Thursday, February 28, 2013

Red Inspiration. Yes there is red in there

Pin It Hi this is M. I have been madly trying to finish this month's IP project. "Mom are you going to post?" ,Major Moma whined. Well maybe she didn't whine, but she sounded a little squeeky.


Yes but it is a Big project.. I have been loving all the scrappy many trips around the world based on the pattern from Bonnie Hunter . Not loving them: adoring is a better word. I love scrap quilts and I am committed to using up my stash.


So here are the 56 blocks, the last row is not visible because my wall was too small. They aren't sewn together in a top yet. But they will be soon.


So how does this fit in with the IP video for February ? Look carefully there is a big red T. I have lines of red throughout the quilt, although there are at least 10 reds, I wanted those red lines to be the unifying note.


No, there is no quiet place to rest your eyes on this quilt, just bright movement to make you happy.


Alpenlight and the Pacific Northwest.

Pin It I am trying to get a project blogged to reflect our Inspiration Project. But I thought all of you might enjoy this brief post with a picture of what I saw the other day when I got off work.  ~M

Monday, February 25, 2013

The Pink T (February's IP)

Pin It February's Inspiration Point was a video.  (What am I talking about?  click HERE)  And though there were many interesting images in the video and the music was a lot of fun.  What stuck in my (Major Moma) brain?  The pink lit up T in on the wall.  What I decided to do was make a basic tunic and mimic a bit of the look of the letter T.  But not too literal.  I am often very literal and I wanted to change things up a little bit.
 
Girl's T-shirt #149

Girl's Sequined Dress #151
 Remembering my Burda Style Magazine from November 2012 had a couple of girl's tunics, I got it out. What I discovered was that it had three tunics and they all came from the same pattern pieces, but featuring different lengths and fabric choices.  So, I took the length of #151 of the tunic but the sleeve length of #149 to make what I had in mind.
 The neckline is kind of a cross between a scoop and a boat neck and if you follow the instructions of #149, it has a bias strip facing and snap closures at the shoulders.  If you follow the instructions of #151, it is lined and thus no need for facing and also has snaps on the shoulders.  I chose a white bias tape for a facing and white snaps.  This will be a part of Abi's Spring wardrobe so I wanted to keep it light.

Speaking of instructions, they aren't great.  I don't know if I was just tired, but I had to read them a couple of time to figure out what Burda wanted me to do.  And really, this shirt is not that complicated.  If I was just given the pieces and told "GO", I would have had an easier time.  And, I found that the markings for the arm holes were not accurate.  The sleeves are the set in variety, so I constructed them on their own.  Then, the instructions said sew from the marking #2 on the sides of the front and back panels down to the hem.  Then insert the sleeves into the open area of the tunic.   (there is no distinctive change in shape of the front and back panels at the arm openings)  Well, my sleeve was much smaller than the hole, so I had to make a new mark and then sew up to that one. 

That was annoying. 
So please, if you use this pattern, measure your sleeve and the tunic to make sure you have the right sizes.  And remember when sewing Burda patterns, you must add your seam allowances.
 I picked out some pink linen I had bought last fall (fabric.com) fully intending something to be made for the girls, but had not yet settled on a suitable pattern.  And then I cut short sleeves and a long strip out of some faux suede I had left over from pants I made for Eli for Christmas 2011.  I placed the strip straight down the middle of the tunic.  To me, this creates a hint of the letter T as the sleeves are the part parallel to the floor and the stripe is the perpendicular portion.  But unlike the inspiration, the T is the white part and the background is pink.
I think it has a bit of a Mod look to it.  In the photos in the magazine, it looks really boxy, but hanging in my sewing room it has some shape.  But, since Abi has not had a chance to wear it yet (and February is nearly over so I must blog about it), I don't know yet how it fits her.  And though she was skeptical when I told her about the center stripe, she really likes it.


P.S.

Without Directions is now on FaceBook! As soon as we figure out how, we will have a "Like Us" button. But until then you can follow this link: Without Directions Facebook Fan Page.

Thursday, February 21, 2013

Gertie's Shirtwaist dress

Pin It I (Major Moma) sew for fun.  It is not my job, it is my hobby.  I cannot tell you how many people see some thing I have made and then say "you should sell that".  NO.  I don't want this to be my job.  First, then it would be work and not play.  Second, what would people be willing to pay me?  In this day of mass produced cheap fashion, people have gotten used to paying small sums of money for clothes.  Even though my clothes would be custom, there just is not a huge market for handmade.  (Yet... I think there is a great movement going on and a lot of people are realizing buying local and buying custom is worth the extra expense.)

Therefore, I sew for me, my kids, and sometimes for gifts.  But recently I received a special request.  My coworker and friend is going to be in a wedding.  And it is a 'theme' wedding where all the clothes will be late 1930's style.  She is the matron of honor and she could not seem to find a brown (the bride's chosen color) dress that fit the theme. 

Knowing that I sew, she asked me to make her something.  I really like this gal and I decided I will say yes, but only if she agreed to certain conditions.  I thought my conditions were pretty unusual and strict and was pretty sure she would go back to searching for a dress on the Internet as soon as she heard them.

My 5 rules:

  1. FUN:  The dress has to be something I want to sew and will make me smile during the process.  I will not let this be 'work'; it still has to be play.  I have been sewing through Gertie's New Book for Better Sewing and she has a lovely dress that is late 30's, early 40s style.  We picked that one; the Shirtwaist Dress.
  2. TWO dresses:  This is not some ordinary dress.  She will wear this dress in one of her friend's most important moments.  I am not willing to let something go wrong.  So I explained what a muslin is (a practice version of the garment) and that she had a choice.  She could buy plain unbleached cotton and let me practice on that to get the fitting right.  OR sh could buy inexpensive dress fabric and I will practice on a casual version of the dress.  But I warned her, the first dress may not turn out because it is practice.  Then, I will make the real dress that will fit her and I will have the right skills to have it turn out nice.
  3. SHE BUYS all materials:  Sometimes people don't realize how much retail prices are for fabric and notions and thread.  So, I gave her my favorite web sight for fabric purchasing (fabric.com) and a shopping list.  She bought all the materials, washed and pressed them, and then I got to work.
  4. I get PAID (not a lot) $: This was the hardest part.  I had to figure out what to charge her.  Because she is a friend and I am not a professional seamstress, I did not want to ask for too much.  But, sewing two dresses takes quite a bit of time and I should be compensated.  We decided on $40 for each dress.  If I was a professional, this would be WAY too little.  But I am not, so we thought it was fair.
  5. I get to BLOG about it:  Yea!  I get to tell everyone about this very neat dress.

Practice version

 For the practice, she choose a heavy weight twill in a light blue with brown polka dots.  It was much stiffer than we expected, but really provided excellent body to the dress.

The main skill I had to learn during the practice version was bound buttons.  I have made bound buttons once before, but Gertie's were a bit different.  She calls for a lot of hand sewing in order to increase control and accuracy.  There were actually several instances where hand sewing was called for in the making of the dress.  So, I would pack the partially finished dress around completing the hand sewing in the car, at friend's houses, etc. Let me tell you, that hand sewing paid off.  My bound button holes look pretty good.

The next tricky part was the shirring on the waist back.  I have used elastic thread for shirring before and had quite a bit of success.  However, I read a review on Patternreview.com that said she had some issues with the shirring pulling too much.  Keeping that in mind, I spaced out my rows of shirring to 1/4 an inch instead of 1/8 an inch.  I also was careful to keep the fabric flat and taught as I sewed each row.  That seemed to do the trick!
front
back


Here it is sleeveless and without facings.  When I got to this point I was a bit worried that the waist was a bit long.  However, when I had my friend try it on, the waist was perfect!

In fact, that is where I did the most altering of the paper pattern from her measurements and I was incredibly pleased that it fit her so well.
 She tried it on without clothes, but for the sake of pictures, she put it on like this too.  The dress is almost done now after another fitting and marking the hem.  And I have started the next version since I am confident about the fit.


 How about you all; do you sew for profit?  Or just for fun?  Or something in between like this project?

Sunday, February 17, 2013

wool wiggle dress

Pin It I (Major Moma) posted about my first Wiggle Dress from Gertie's New Book for Better Sewing in December.  That one was a wearable muslin.  A wearable muslin is when you do a practice version of the clothing article in inexpensive fabric in order to learn any new techniques and to make all necessary fitting adjustments.  You could just do this with real muslin fabric.  But then you have all that work into something you can't wear.  For just a few dollars more, sometimes you can make something that, if it turns out, is wearable.  But it needs to still be cheap so you don't feel bad if it is not really 'wearable' in the end.

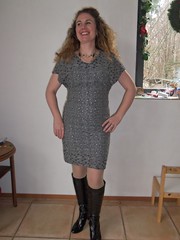
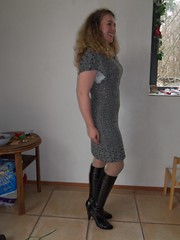
 What I really wanted when I first saw this dress was to make a fully lined version of the dress in wool.  And I have finished that version!  I did make a few adjustments though from the first version.   The fitting adjustments mainly focused on getting the hips right for me.  I brought the hip up about 1/2 an inch and shaved off about 1/2 on each side seem in the hips. 

I also made a minor adjustments to the construction.  Instead of a lapped zipper, I inserted an invisible zipper.  According to Gertie, lapped zippers are very common in vintage clothing.  But I am not a vintage purist.  And I had an invisible zipper on hand.  And I am better at inserting invisible zippers.  So, there it is.  I have a special invisible zipper foot for my Brother machine.  And let me tell you, it is wonderful.  If you are going to insert invisible zippers, I highly recommend you buy the special foot.

Since this was my good version of the dress, and because it is wool, I used better finishing techniques.  I serged all the edges of the pieces to prevent any unraveling and to keep it nice and neat inside.  I also used silk organza for my under arm gussets instead of a strong sew-in interfacing.


I was worried that this dress would not fit as nicely as the other because the first one had a bit of stretch in the fabric (not a lot) and this one had a lining so there could have been less ease.  But, it turned out great.  I can still move and pick up my kids in this dress.  And yet it looks so tailored.


I love it .

This is why I want to sew and gain new skills.  Now I can wear beautiful things like this dress and say I made it.  Sewing for little guys is a lot of fun.  And can be very practical.  But, I really wanted to be able to make fine clothing.  I think I am starting to reach that goal.  I am not a tailor but, this is pretty nice.  What are your sewing/crafting/hobby goals?

Wednesday, February 13, 2013

Happy Valentine's day!

Pin It
Happy Valentine's Day!


embroidery from urban threads
Since it is the day when wearing pink and red together is OK and that everyone wants to stick a heart on just about everything, I (Major Moma) thought I would share the last thing I was able to make out of the heart minke.  I made a coat dress and vest earlier this winter.   But I actually have had this fabric for a long time.  I got it on sale and bought a bunch of it.  I previously made two hoodies with it.  One for my oldest daughter and one for her friend.  I don't have the pictures for the friend's but here is Abi's.  I made this a year or so ago. 

Ottobre pattern from 2007
It is a great fabric, nice and cuddly and easy to care for.    And I had just a little bit left.  So, I made a vest for Isa.   

I just used a basic bodice from a dress pattern and lengthened it.  And then I lined it with pink lining fabric and put on cute little bow buttons.


I think it would be cute to wear today.  I know that Abi is wearing hers to school.  But I doubt my husband will even think to put this little vest on Isa for the holiday. 

Why would it be his decision?  Well something pretty wonderful about my husband is that he has chosen to be a stay-at-home DAD.  See, I work full time in a job that I cannot just quit.  And we both feel strongly that it is actually my calling.

And when we decided to have children, he decided having a parent stay home with them, at least when they are below school age, was a priority for him.  And thus, he did.

When I come home at night, I am greeted by happy kids and most often dinner is being served.  More than just cooking, he is truly a home and family manager.  He makes sure that the family is well taken care of.  It really is amazing that he made this choice.  But that is the kind of guy he is.  He makes decisions that are best for the family. 
And that is why he is my #1 Valentine.
~Major Moma

Sunday, February 10, 2013

Momma Sewing Style

Pin It Instead of simply talking about the style I have when sewing for my children, I thought I would talk more about my style of sewing.  It is simply put ... mama style.  I am lucky to have a large space that is mainly for my sewing.  But it is so much more than a sewing room.  It has two boxes of toys, craft bins, and a tiny table and chairs for coloring.  It also houses the family computers.

can you spot the stuffed animal?
And the toys don't always stay on the floor or in those toy boxes.  When I sew, I usually have my kiddos wandering around in the midst of my sewing.  They are playing all around me.

 Often, Isabel wants to participate.  She sits in my lap and "helps" me sew.  I let her press some of the buttons, and that keeps her feeling like she is part of the team.

When I really need her not in my lap, I give her a bag of buttons or zippers to sort through.  That usually occupies her for a while.


And I like it this way.  See, I am a working mother and as much as I love to sew, I also cherish the time I have my kids around.  They are old enough to enjoy playing on their own, but I make sure that they can play around me while I sew.  Especially the baby.
 
Also, there are frequent times when we are taking a break from sewing and dance around together.  This slows down the sewing process, but it keeps what is important ... well, important.
She is not so little anymore either, but she likes to color in here and play on the floor as I spend the weekend creating. 

So on to the actual outfit she is modeling in the sewing room.  Another part of my sewing style is that I hate wasting fabric. I am not a huge fan of upcycling, but I do my darndest to use every inch of the fabric I buy.   So, when I had some leftovers from PRP projects this month, I pieced them together for an outfit for the 'baby'.  With the left over pink sweater knit from Abi's Love is in the air outfit, I squeeked out a basic t-shirt (Kwik Sew's Sewing for Toddlers).  
Then, I used the blue corduroy from Blue Yonder Boy to make Isa some basic pull-on pants (same Kwik Sew's Sewing for Toddlers book).  I dressed them up just a little bit with some top stiching and a decretive hem on the ankle.
 
 I tried to tie the two together by embroidering a circus horse in a matching blue on the sweater. The design is from a book of redwork embroidery my mother had given me.  It has lots of classic designs.  The contrast of the embroidery on the sweater was really not enough, but for a 'spare' outfit out of nearly scraps, I think it will do fine. 
 
 
TIP:  Normally when working with a fuzzy fabric, you should use a water soluable 'topping' when stitching out the machine embroidery.  Since this fabric is really not that fuzzy I did not think it was necessary.  But, I probably should have and in order to make it just a little more visible, I stitched it out a second time on top of the first.  If this had been a more dense design, I would have definitely needed the topping to keep the fuzziness from popping up in the stitching.
 
So there you have it; an outfit sewn Major Moma Style.  Sewing up fun basics with the kiddos fully involved.

Friday, February 8, 2013

Say something nice

Pin It A gentle word turns away wrath.


When someone is angry at me (Major Moma) , my natural reaction is to get angry back. How dare they be mad at me for doing ___ (whatever I have been accused of)! I often feel this way even when I have done something wrong. But even more so when I think I have been ‘unjustly attacked’.
If I lash back in defense of my honor, does it help? Or does it simply escalate the situation? This year I am working on using more kind words. And this is especially hard when I feel attacked. But, what if my response could help calm the situation instead of escalating it?
provided by my husband
Our anger actually blurs our senses.  I cannot see truly what the issue is and how I contributed to the problem when I am angry.  Like the ice on this window, I can only see a skewed picture of what really is there.
A gentle word turns away wrath. If I can respond gently, then maybe we all can calm down and address the issue.  Then, in a calm moment, I may be able to see clearly.

provided by my husband
And what about my own wrath? What happens when ___ [insert name of child, husband or friend] does something and I respond in anger? What is my first, natural reaction?

You know the saying, “If you don’t have anything nice to say, don’t say anything at all.”
But what if, instead of responding with silence, I respond with a kind word?

I am not talking about an insincere, fake, sappy kind word. But really look to that person, figure out something that I can honestly be kind about, and say it. Then, that gentle word can turn away my own wrath.  Then, we can see clearly the issue, and address it.

provided by my husband and son
This is my challenge this month.  Well let's be honest, I will be working on this for a while.  When I don’t have something nice to say, I will find something nice and SAY IT.

There is enough anger in this world, it does not need mine. I am going to do my part to reduce anger and violence.


Note:  As part of my New Years resolution, I am trying to gain more control of the things I say.  And in order to increase my accountability, I am blogging about it.  I am not trying to be preachy ... just sharing.

Monday, February 4, 2013

OOPS! Mis-adventures of a sweater dress

Pin It
I (Major Moma) am not sewing along with PRP this week.  The theme is  up-cycling a men's button down shirt and it just did not interest me.   Plus, my husband was not willing to give up a shirt.  Thus, this was a sewing for me weekend.  Yea!  that is so much fun too. Except, things did not go entirely smooth on this project.


I have been really into sweater fabric lately and I ordered some fabric to go with a pattern in my burda magazine I bought.  I thought it would be perfect for pattern Chill Dress 11/2012 #136B.  But, when the fabric arrived, I noticed those dots I liked so much were not shading, but instead lace-like holes. OOPS #1 

So, I needed to make a slip to wear underneath.  I drafted a simple sheath dress with a low neckline and mini skirt so it will work with a variety of dresses.  Since I had to make a slip, I figured it should at least be versatile. 

But as I was trimming a seam allowance, I snipped into the dress it self! OOPS #2  I patched the hole.  Hey, no one is going to see it any way!


Finally, I was free to sew the dress I originally wanted to sew.  It was a super easy pattern!  The neckline was the most complicated part as it calls for bias tape to finish the inside.  It is done the same way as the zebra shirt (blogged about here).  The rest was super simple.... shoulder seams and side seams.  One caveat though.  If you want a more relaxed fit, go up a size from your usual.  I actually did not plan on this dress being so fitted.  Burda is usually pretty good about standard sizes, but they suprised me here.

I hand sewed the hems in order to have an invisible finish.
It looked so pretty on the hanger so I tried it on.  Well, I lined up the selvages, just like I was told in the pattern, but what I did not realize is that the stretch on this fabric goes the opposite of what is normal!   So, it stretches vertically; not horizontally.  So basically, the dress is hard to get on, and I do not have room to gain a single ounce.  OOPS #3

When I discovered the mess up, I assumed I must have just cut it wrong.  But I then double checked the fabric.  And the selvages really are parallel with the stretch.  So strange.

But, it is a pretty date-night dress and I guess I will keep it as motivation to not over eat.  So I guess the lesson here is be more careful when using fabric you are not familiar with.

Sunday, February 3, 2013

February's Inspiration

Pin It We had a great time with last month's Inspiration Point.


M stretched herself and made a modern quilt.


Major Moma made some warm pants and a hat


and McH was the most adventurous and made plaid antlers ... but hit a major snag in figuring out how to mount them.


For February, we are doing something different and giving you video.  It is of a cello and spoons making some fun music. 


You can create something inspired by the music, the spoons, anything in the video!


P.S.

Without Directions is now on FaceBook!  As soon as we figure out how, we will have a "Like Us" button.  But until then you can follow this link:  Without Directions Facebook Fan Page.
01 09 10 11 12
Blogging tips